Products: Audio Experience Symphonies Tube Line Stage
Audio Experience Concerto Tube Phono Stage
Manufacturer: YS Audio, Hong Kong
Prices: Symphonies $995 List, $400 “Buy it Now” on Ebay including
shipping worldwide
Symphonies $1200 List, $450 “Buy it Now” on Ebay including shipping
worldwide
Reviewer: Nels Ferré
Reviewed July 2004
Background
I’ve had more than a few different preamps in my system since I’ve been writing for TNT- Audio, and a couple of different phono stages. Most recently, my preamp has been an Audio Research SP-9 Hybrid Preamp, using the built in phono stage. A while back I sent it back to ARC for a checkup, where they retubed it, replaced a few aging caps and performed a modification to the phono stage. Apparently, there had been a running change in the phono stage during production of the SP-9, and mine was an early model. The trip back to Minnesota wasn’t cheap: nearly $300 not including shipping costs. Upon its return, it sounded different than when I shipped it away, unfortunately, it sounded worse. Harsh, uninvolving, and clinical are the words that immediately come to mind. After a few weeks, it became obvious that yet another preamp was going to find its way into my system.
I knew that my new preamp would be tubed; I just like tubes. While searching Ebay for pre-owned high end tube preamps (used can be a great way to same some hard earned cash) I stumbled across the Audio Experience Symphonies line stage and matching Concerto Phono stage, made by YS Audio of Hong Kong. I researched the net, checked out the manufacturers site, and after mulling it over for a couple of weeks, took the plunge. Ordering and payment were easy, and a couple of weeks later both units arrived on my doorstep.
Symphonies and Concerto
 Both units arrived double boxed and well packed. The outer boxed was stuffed
with crumpled Chinese newspapers. The Owners Manuals could use some help (the
English is poor) although it was easy to decipher the intent of the words.
Both units arrived double boxed and well packed. The outer boxed was stuffed
with crumpled Chinese newspapers. The Owners Manuals could use some help (the
English is poor) although it was easy to decipher the intent of the words.
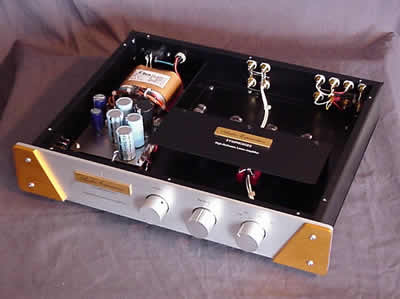
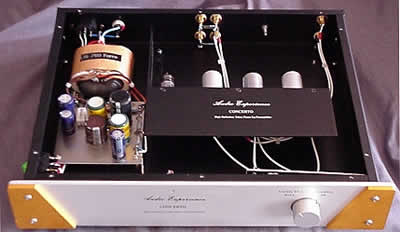
Both units use point to point wiring in the audio circuits. (The power supply is mounted on a board.) Tubes used are a 6X4 as a rectifier tube, and 3 12AX7 tubes, one as an input tube for both channels. (The 12AX7 is a dual triode, basically two tubes inside the glass envelope.) The two remaining 12AX7s are the output tubes, which flank the input tube. Each 12AX7 is nestled inside a tube shield, presumably to reduce noise and interference. The buyer must install the 6X4. Funny thing here, while installing the tube, there a label beside the transformer “ Do not remove cover. No user serviceable parts inside…” :-)
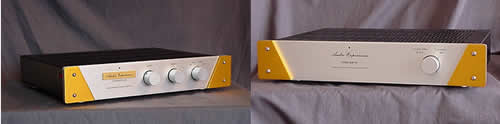
I found both units to be quite attractive, once I removed the garish gold side plates with an Allen wrench. Build quality was very good, the only negative here is that the top plate must be aligned very carefully when reinstalling, as the alignment of the holes is off just a bit. Also, the top is put on at the factory way too tight, especially considering the top plate must be removed to install the rectifier tube.
Both units have minimal controls: the Symphonies line stage has a side mounted power switch, and controls for volume, balance and input. Around back is the IEC input for the power cable, four line level inputs and two pairs of preamp output jacks. Next to the IEC jack is the line fuse.
The Concerto Phono stage is even simpler. It has the side mounted power switch and a four-position equalization knob to set the unit for the type of recording being played. There are settings for RIAA, London FFRR, Columbia, and SP. Around back are one pair of inputs, two pairs of outputs (marked high and low) a ground lug, and the IEC jack and line fuse. The Concerto is rated at 54db of gain, more than enough for any MM or high output MC cartridge. I used the high outputs during listening. The low outputs may be useful if you have a very high output MM cartridge, like a Rega (6.5 mV output.) A step up transformer or pre-preamp must be used with low output MC cartridges.
Although tubed, both units run very cool. The owner’s manuals recommend an extended break in period (150 hours.) Additionally, the manuals recommend not listening critically for 45 minutes, giving the circuits time to warm up and stabilize. I totally agree here, but recommend leaving both units on continuously. Think of the side mounted power switches as “vacation switches.” Leave them on unless you are leaving the system for an extended period.
Half Truths
The specifications and description of both components as described by YS-Audio online can be best described as “half truths.” They describe using Dale resistors. This leads one to believe that’s all they use. The description should read “ Dale resistors in critical areas of the audio circuit, regular carbon resistors everywhere else.” Ditto the Alps pots on the Symphonies, actually the lowest pot that Alps makes. The same for “All hand made by point to point.” Actually, the audio circuit is point to point, the power supply is not. I just wanted to set the record straight here.
The Concerto and Symphonies In Use
 Please note, this review was a very long process, and I listened to hundreds,
maybe thousands of hours of music through these components. Therefore I will
not be citing musical examples, as both pieces exhibited the observed qualities
with nearly every piece of music played though them.
Please note, this review was a very long process, and I listened to hundreds,
maybe thousands of hours of music through these components. Therefore I will
not be citing musical examples, as both pieces exhibited the observed qualities
with nearly every piece of music played though them.
After receiving the units, I powered them up and left them to run continuously for a period of weeks. The preamp was fed the output of my McIntosh tuner while I was at work. For the first few weeks while I was home, I played LPs nearly exclusively to break in the phono stage.
As the manufacturer recommends, both units did improve after 45 minutes or so, but the improvements were marginal at best as far as the long-term break in was concerned. I found the phono stage to be especially disappointing. After the units were broken in, I listened to CDs mostly because I found the performance of the Concerto to be so poor.
YS Audio does state that using the CD input on the Symphonies will give the best performance. I tried the Concerto into this input, and I found the manufacturer’s claim to be hogwash. It shouldn’t, and didn’t make a difference which input was used, the phono stage still lagged behind in performance. It was dark, shut in, dynamically compressed, and definitely uninvolving and unmusical. The Concerto was muddy across the audio band, like a foggy window. It exhibited a marked lack of detail and resolution. It did improve when used with the Audio Research SP-9, but lagged behind the built in phono stage of the SP-9. Why the Concerto didn’t mate properly with the Symphonies is still a mystery. The same adjectives can be used for the Symphonies line stage as well, albeit to a much lesser degree. Both units were also very thin sounding in the bass regions, and a bit tizzy on top. All in all I found the Audio Experience offerings to be a very disappointing pair of components.
I’m not saying the Audio Experience components are a bad deal. One doesn’t spend much in the overall scheme of things to buy them, and that is exactly what one gets: not much.
That Nagging Feeling
Not only was I disappointed in the performance of the Symphonies, and even more so in the Concerto, I really couldn’t determine why the components didn’t perform better. The circuits are simple enough, a good thing. Build quality was very good. But no matter how long I ran them, they didn’t improve much. They did get a little smoother, sure, but they still missed the mark at their fundamental task: making music. I had a nagging feeling that the units were basically well designed, but the execution was lacking; that there was music locked up inside the boxes, so I proceeded in doing some research to see if the music could be freed. YS Audio kindly provided me with a schematic for the Symphonies (but not the Concerto) with the understanding that I not publish them online.
The first change I made was the tubes. I had never tried the Electro Harmonix tubes, and they were inexpensive, so I got 6 of them ($9 each) and changed the stock Ei tubes. While there was a definite improvement in both bass response and dynamics, both units obviously need more than a simple tube change. As an aside, I have read that there is a high failure rate and wide sample-to-sample variations with the Ei tubes.
After talking with some people and doing some research on the ‘net, I decided to upgrade the output and coupling capacitors in both of the units. Our own Giorgio Pozzoli wrote a favorable review on the Audience Auricaps, and Scott Faller seemed pretty hot on them as well, so I called Richard Smith at Audience and explained what I was up to. He was as interested in the outcome as I was, and a few days later, I had the necessary caps.
Before I Proceed
Please be aware that high voltages in tube gear can injure or even kill. If you are unsure of your abilities in modifying any piece of audio gear, either leave it alone or have someone who is qualified perform the work for you. Neither I, TNT-Audio, nor anyone associated with this particular project will assume any liability for anyone who fails to heed the above warning. Additionally, I will not assume any liability for anyone who renders his or her gear inoperable while attempting to modify it.
Modifying the Symphonies
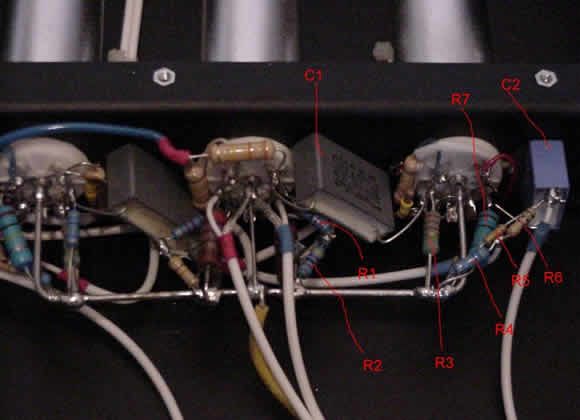
The Symphonies line stage is the easier of the two units to modify so I’ll start here. Unplug the unit and remove all of the tubes before proceeding. Remove the decorative plate in front of the tubes. Changed are the output caps two small blue Philips units per side valued at 2uf 250V(C2 in the picture) as well as the coupling caps valued at 1uf 250V, the larger rectangular gray units (C1 in the picture) between the driver tube and the output tubes. There are also two small Wima caps located towards the front of the unit, glued to the base of the chassis. These are replaced by larger 1uf capacitors. All of the replacement caps have a value of 450V. The output caps are changed to 2.2uf.

The output and coupling caps located under the black metal cover did not appear to be marked for polarity, so I checked them with a digital multimeter, and marked the old capacitors for polarity with a magic marker, to make replacement easier. The coupling caps (the grey ones, remember?) are a mirror image of each other, so pay close attention here. The smaller Wima caps are marked for polarity, make sure to observe this when replacing these. Remove the old caps, and add the new caps, one at a time. There won’t be room under the black cover for the new output caps, so glue them to the base of the unit with some epoxy. The 1uf caps that replaced the smaller Wimas are glued to the base of the unit as well. Check for good solder joints, and this part is finished.
With the signal path finished, now it’s time to upgrade the power supply, located on the small board in front of the power transformer. Here, add 1 .47uf cap, as a bypass cap, to each of the 4 47uf Rubicon filter capacitors. Carefully remove the 4 small nuts that secure the board to the chassis and lift straight up. Then gently tilt the board rearward, towards the transformer. Be very careful observing polarity here, a mistake could be disastrous. On the underside of the board, solder the leads from each of the 4 new caps to the existing solder pads on the board.
After reviewing the schematic, Richard Smith strongly suggested replacing the 100uf 100V polarized electrolytic cap on the board with a much beefier 680uf 200V unit. The new cap will not fit on the power supply board. I got mine from Digikey for less than $5.00 US each. This is very straightforward. Use a resistor to discharge the cap for safety. De-solder the small cap and discard. Using some insulated solid core wire, solder two small length of wires to the new capacitor making the negative lead shorter. The other end of the wires will now be soldered to the underside of the board where the leads from the old capacitor were. Check the solder connections, and clip away any excess wire from the new connections on the underside of the board.
Secure the board to the chassis. The new bypass caps will stick out of the right side of the board, as they are too large to fit underneath. The new, much larger power supply cap will need to be glued to the base of the chassis, between the power supply board and the front of the chassis.
Replace the tubes, and reinstall both the decorative and top panels. Assuming you did everything properly and have no bad solder joints or electrical shorts, the unit should power up and work properly.
Modifying the Concerto
The Concerto is modified in very much the same way as the Symphonies, with a few exceptions.
The output capacitors on the Concerto are 2 1uf 250V units (1 per side); the replacement 450V units will fit underneath the black metal cover inside the unit.
There are no Wima caps to replace inside the Concerto.
The power supply is identical to that of the Symphonies. Proceed as described above.
Here is the somewhat tricky part: there are 4 1000pf capacitors located on the equalization board that should be replaced. Using an Allen wrench, remove the knob from the front panel. Remove the nut located behind the knob that holds the control to the front panel. Inside the unit, there are two small nuts the secure the board to the chassis. Remove these and gently move the board rearward. You will see 4 very small brownish-reddish caps on the board. These caps are polarized, positive on the left as one reads the values. Remove and replace each capacitor, substituting 1000pf 600V Auricaps. The leads on the new caps will need to be cut and stripped to nearly the body of the capacitor. Be very careful doing this. The new caps will fit on the opposite side of the board, between the board and the front panel. Once this is complete, check the solder joints again and reassemble.
The total cost of the parts for modification, including tubes, is approximately $100 US for the Symphonies, $130 for the Concerto. I spent approximately 1 hour per unit performing the modifications.
The Results
Both units improved immensely after modification. The Symphonies, in my opinion, became nearly perfect, with a few glaring faults. Firstly, the bass tightened up, and became lithe and lean, a bit too lean in my opinion. I wished I could have bumped up the amount of low frequency output just a bit. Bass also seemed to go much deeper than the preamp had in stock form. The clarity of the Symphonies increased to no end, it became really easy to pick out different instruments inside the music. Unfortunately, separation of instruments was what it did very well, but the instruments and voices did not seem to blend well. Music with the modified Symphonies was a bit broken and disjointed. Not really bad, mind you but noticeable enough to be a distraction. Imaging improved, and the mids became silky without being syrupy. And the tizziness in the highs disappeared. All in all, considering the cost, a good performer for the money, but don’t expect perfection. I ultimately could not live with the shortcomings and sold the Symphonies (for a loss.) It is possible that more mods (or possibly different, more expensive vintage tubes) will improve the performance, but I have tried to keep the mods simple and the cost as low as possible for our readers.
The modified Concerto became the real treat in this match up. For my tastes, it’s as good as I expect to find for anywhere near the money. I suspect I’d have to spend a least double the money to get a noticeable improvement in performance. The modified Concerto is dead quiet, the bass deep and tight (ok an bit more couldn’t hurt.) The mids and highs are natural and believable. Resolution is excellent without being analytical. With the modified Concerto, I can, and do enjoy my LP collection for hours on end without giving my CD player a thought. I still think there may be more music locked inside the box, but if I never get around to finding out, I won’t be losing sleep over it.
I did find that the Concerto performed just as well, possibly even better, with the stock power cord rather than a fancy high end audiophile grade cord.
Conclusion
In totally stock form, I’m unable to recommend either component; I found them lacking in such basic areas as bass response and dynamics. Spend an hour so and a few bucks upgrading tubes and capacitors, and the Symphonies improves greatly. Even so, I’d still recommend approaching the Symphonies with caution.
The Concerto, while in stock form is the worse of the two components, becomes the real surprise. As currently modified, it’s a winner. There may still be more tweaks in store here, possibly Dale resistors throughout, more Auricaps, some Dynamat coating the inside of the cabinet. I’ve even considered a battery box to power the unit sans AC. Whether this project is done or a work in progress, only time will tell, but its definitely not for sale.
I’d like to thank “Frodo Joe” from the Audio Asylum chat room for reviewing the Symphonies schematic, as well as Richard Smith of Audience for the same, as well as providing the excellent Auricaps used in the modifications.
© Copyright 2004 Nels Ferré - www.tnt-audio.com