[ Home | Staff & Contacts | HiFi Playground | Listening tests | DIY & Tweakings | Music & Books ]
Product: Sleeves for early records not conforming to modern size standards
Producer: not for sale, TNT-Audio DIY design
Approx.cost: .60 to $1 per sleeve
Author: David Hoehl - TNT USA
Published: December, 2021
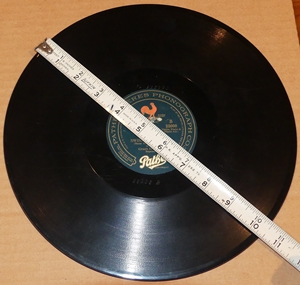
In the world of LP records, we are accustomed to standardization: the speed is consistently 33 1/3 RPM, the grooves are consistently about the same width, the “cut” is consistently either 45-45 stereo or lateral mono, and the size is consistently 12" with the occasional 10" oddity. None of these characteristics is constant when it comes to pre-LP records, however, and in particular disk record diameters could vary anywhere from 5" or so up to 20" for some rare Pathe pressings intended for commercial venues. That company was particularly fond of proliferating odd sizes, and in my collection I have many Pathe records of approximately 10.25" or 11.25" diameter that have long been in need of sleeves. That's a problem: sleeves for 10" 78s are too small for the former, and those for 12" LPs are too big for either.
![[Envelope pack]](../jpg/02-envelope-pack-300w-283h.jpg)
Appropriately sized sleeves are out there, available from a specialist dealer, but I always prefer to save a nickel where I can, and especially since “supply chain issues” began to appear in the aftermath of the COVID pandemic (if you can really say “aftermath” when the miserable bug is still at large in the world), I don't like relying on a sole source for anything. Hence, I when I spotted a listing for 10.5" and 11.5" square “invitation envelopes” from an Amazon seller called JAM Paper, my first thought was, “I could make those into record sleeves!” A craft project was born. For those who might like to follow in my trailblazing footsteps, the following outlines the procedure I eventually worked out.
The envelopes come in quantities ranging from 25 to 1,000. The price per unit falls as the size of the order increases. Both sizes are plain white.
![[Flap]](../jpg/03-envelope-showing-flap-300w-216h.jpg)
These envelopes, of course, are designed for the mail, and therefore each features a flap coated with no-wet adhesive and a pull-off keeper strip. The first step, then, in the envelope's odyssey from postal implement to record collector's supply is to remove the flap.
![[Cutting off the flap]](../jpg/04-envelope-on-cutter-300w-225h.jpg)
I found that a standard knifeblade paper cutter was the ideal tool for the job. Placing the envelope with the crease of the flap running right along the cutting edge made for a perfect flap removal every time.
![[Finding the center]](../jpg/05-trimmed-envelope-with-ruler-300w-278h.jpg)
Like me, you'll probably want a circular window for the record label, just like what a purpose-made record sleeve would have. Time to dust off those skills from high school geometry class! First, find the center of the square by running a straightedge from top right to lower left corner and then from top left to lower right, in both cases striking a pencil line across the middle area of the paper. Where the lines cross, you have the center of your sleeve. You can run the lines the full length from corner to corner if you wish, but all you really need is just enough to cross in the center.
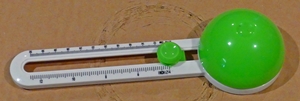
Now you'll want to cut the circular window. For this task, I bought a circle cutter as shown in the photo to the right, and I can report that it works well. Amazon has the identical device under different brand names for various prices. I paid about $10 for mine, which came with a few extra blades. Also available is a leg-and-point design, like a compass; I haven't tried one of those.
One downside to my cutter was that it came with no instructions and thus no information about how to remove the little green plastic shield that protects the blade (and other things from the blade) when it is not in use. My first instinct was to pull the shield straight off, but it turns out that it slides off to the side. Be careful not to slice a finger in the process!
![[Center marked and drawing alignment circle]](../jpg/07-trimmed-envelope-with-center-mark-300w-290h.jpg)
If you choose a circle cutter like mine, with a broad circular base instead of a centering pin, getting it perfectly, or nearly perfectly, centered on the point determined a couple of steps above can be challenging. To address that issue, take a compass and drew a circle of approximately the same diameter as the cutter's base as shown here.
![[Alignment circle drawn]](../jpg/08-trimmed-envelope-with-center-mark-and-circle-300w-268h.jpg)
The result is a guide circle perfectly centered on the sleeve-in-making. Note that it will be of smaller diameter than your label window.
![[Circle cutter in position]](../jpg/09-circle-cutter-positioned-300w-279h.jpg)
Centering the cutter then is just a matter of placing it evenly inside the circle. Before you do, put something underneath to protect your table surface. I found that a 12" square of corrugated cardboard, originally packing for some records I'd bought on eBay, was perfect for the job.
![[Detail]](../jpg/10-circle-cutter positioned-detail-300w-267h.jpg)
Also before placing the cutter on the workpiece, set it to make a hole of the desired diameter. I chose four inches, which as it happens is the smallest setting on the cutter's scale.
![[Cut complete]](../jpg/11-cut-complete-300w-276h.jpg)
To cut the window, hold down the cutter base with one hand and rotate the projecting arm 360 degrees in either direction with the other. The knife blade on the underside of the arm will cut a perfectly circular hole through both sides of the envelope. You probably will need to give the arm an extra revolution or two just to be sure you completely cut the paper, particularly on the seam that runs down one side. During its rotation, press down lightly on the arm to make sure the blade goes through all layers of paper. Don't worry about cutting into the protector under your sleeve; that's why it's there.
![[Completed sleeve]](../jpg/12-finished-sleeve-300w-277h.jpg)
Pop out the two scrap circles of paper, and, voila! You have a nice home-made 10.5" or 11.5" sleeve, ready and waiting for your off-sized 78.
![[Completed sleeve with record]](../jpg/13-finished-sleeve-with-record-300w-267h.jpg)
The 11.5" envelopes are a perfect fit for the ca. 11.25" Pathe discs. The 10.5" envelopes are a good fit for most (not quite all) 10.25" Pathe records. Note that Pathe was never obsessive about consistent dimensions, and I found that two or three in my collection were a trifle too big to fit the 10.5" sleeves. For those, I carefully separated the seam on one side, fitted the record in, and taped it back together. Also, 10.5" Odeon and Fonotipia records proved a hair too big for the 10.5" sleeves, too. On the basis of that experience, I'd say this project is of most potential utility to those of us with Pathe records in need of sleeves. One other group, however, may also find it useful.
![[Edison C-250, drawer extended]](../jpg/16-c-250-drawer-out-300w-359h.jpg)
Edison diamond discs, although regularly 10" in diameter, are a full 1/4" thick. Therefore, they tend to strain the seams of conventional 10" record sleeves; the little bit of extra “give” in a 10.5" sleeve makes for a much easier fit. Original Edison sleeves, of course, fit perfectly, but they were made of paper that has not stood the test of time very well, and more often than not they are pretty fragile and ratty. A sleeve made of modern paper will not suffer from that problem.
In addition, if Pathe was indecisive about its record sizes, the same can be said of Edison about the storage systems in its diamond disc phonographs. One commonly encountered variant is a drawer or drawers that pull out from inside the cabinet, like a file cabinet concealed behind a door. The bottoms of these drawers are not flat boards; they are open, with two flat rails running down either side a few inches apart to support the records. Their interior, facing faces are cut at a slant to grip the records, a design that does not work well with straight-across flat-bottomed record sleeves.
![[Original Edison sleeve]](../jpg/17-original-sleeve-200w-294h.jpg)
The Edison company recognized this characteristic and actually printed lines on its sleeves with instructions the buyer should cut along them to make the sleeve fit a phonograph's storage drawer.
![[Original Edison sleeve detail]](../jpg/18-original-sleeve-detail-300w-229h.jpg)
No one today, however, would want to mutilate a surviving original Edison sleeve in this manner.
![[New sleeve trimmed]](../jpg/19-new-sleeve-trimmed-300w-277h.jpg)
A modern DIY sleeve is a different matter. With a little experimentation, a good angle can be found to fit into those troublesome Edison storage drawers with little or no bunching or crinkling. Once that angle is “dialed in,” I recommend keeping the first sleeve so trimmed to serve as a template for any to follow. Note that the angle may not exactly match what was printed on the old Edison sleeves, given that the new ones will be of slightly different dimensions. As with removal of the envelope flaps, a knife edge paper cutter is a good tool for making the angled cuts.
![[New trimmed sleeves in C-250 drawer]](../jpg/20-in-machine-300w-257h.jpg)
Here's an example of such trimmed sleeves in action. Each record sits securely between the rails with no interference from its sleeve. As a bonus, these being new production instead of antiques, you can without a guilty conscience label each sleeve with information about the record it contains to ease locating a disc that you wish to play without pulling any out of the drawer to read their labels. Naturally, you can do the same with new sleeves for Pathe records as well; given that Pathe records can run at various speeds, you might want to label each disc's sleeve with the disc title and speed for future reference.
![[heart on sleeve]](../jpg/21-heart-on-sleeve-300w-269h.jpg)
In fact, you can even go beyond the purely functional to give your work a personal touch--for instance, maybe you'd like to let the world know you wear your heart on your sleeve.
"You just couldn't let that one go, could you?" I hear someone mutter.
Well, I just figured ending this article in a serious vein would be disheartening.
"Ugh."
Anyhow, there you have it: a way to produce your own modern-day sleeves for off-sized records. Happy cutting to all!
DISCLAIMER. TNT-Audio is a 100% independent magazine that neither accepts advertising from companies nor requires readers to register or pay for subscriptions. After publication of reviews, the authors do not retain samples other than on long-term loan for further evaluation or comparison with later-received gear. Hence, all contents are written free of any “editorial” or “advertising” influence, and all reviews in this publication, positive or negative, reflect the independent opinions of their respective authors. TNT-Audio will publish all manufacturer responses, subject to the reviewer's right to reply in turn.
![]()
© Copyright 2021 David Hoehl - drh@tnt-audio.com - www.tnt-audio.com
[ Home | Staff & Contacts | HiFi Playground | Listening tests | DIY & Tweakings | Music & Books ]