![[Burson Conductor 3R]](../jpg/burson_conductor_front_view.jpg)
[ Home | Staff & Contacts | HiFi Playground | Listening tests | DIY & Tweakings | Music & Books ]
Product name: Burson Conductor 3 Reference
Manufacturer: Burson Audio - New Zealand
Cost: $1744. US. (Currency conversion)
(YMMV)
Reviewer: Roger McCuaig - TNT Canada
Reviewed: January, 2021
A year ago, I didn't even know that Burson Audio existed. When the note came out from the Head Office to tell us that Burson had a review unit available I volunteered. What intrigued me the most was that the Conductor uses an updated version of the DAC chip used in my Doge 7 Tube DAC that I love so much (or, in fact, two chips in the case of the Reference model). My Doge 7 uses the ES9018 chip, after that came the 9028 and then the 9038 which is used in the Conductor models. The 9018 was considered one of the best when it arrived on the market, so it is reasonable to presume that the two ES9038 DAC chips in my review sample are a sign that this is a product to be taken seriously.
Of course, I did a bit of reading to prepare for this review. Burson started off making Op Amps in the late 1990's. Not just ordinary Op-amps but custom designed, single purpose Op Amps that emulated discrete audio amplifier circuitry (TNT-Audio has already reviewed several of their op-amps and discrete modules). Burson has gradually added several products over the years and they tell me that the first Conductor model arrived in 2006. The current model is the 5th revision of this design and the first one to incorporate the ability for op-amp rolling.
There are a lot of things to talk about regarding this unit and this review kept getting longer and longer, so it has been split into two parts. Here is part 1.
On the back plate one finds, Conductor 3, Model R180. The only way that I was able to establish which model I had actually received, the Reference vs the Performance, was to compare what I had with the photos on the web site and in the downloaded manual. Doesn't that seem strange?
![[Burson C3R Back]](../jpg/burson_conductor_back_view.jpg)
Burson calls it a 3 in 1 concept: DAC, preamp and headphone amp. The DAC section has a very impressive pedigree with “two” ES9038 DAC chips and the Thesycon XMOS chip to handle up to DSD512 files and 38 bit / 786 kHz audio for Windows users as well as OSX and iOS users. I was able to play DSD512 files however I don't own any 38/786 audio files so we will have to take their word on that one. But why two DAC chips? I have not seen a block diagram of the architecture of the C3R however I can say that theoretically, running the analog conversion process twice and then taking the average of the 2 outcomes reduces the error by the square root of 2 (not my math, I read it some place). Of course, there are other consequences of using 2 DACs, not all of them positive. Whether Burson decided to take this design decision based on performance or on marketing benefits, or possibly both, is only known to them. The analog end includes a 7.5-Watt Class A headphone amp (with 2 headphone jacks!) and a preamp. The heart of this section are the V6 Vivid op-amps which, I understand, is the top performing model from Burson. A spare set of op-amps is also provided. When I questioned Burson on this they explained that swapping op-amps is an easy way to diagnose and locate any op-amp related problem. Note: In the photo below the Opamp location is circled in yellow.
The unit has a USB-C port as opposed to the traditional USB-A type. The supplied USB cable is very short and looks to be rather poor quality. First impressions are important, and this cable doesn't leave one with the impression of having purchased a high-end product. Certainly, one can imagine that many will do as I did and use their own cable. Fortunately, Burson has included a USB-C to USB-A adapter for this purpose. The C3R is also equipped with a Qualcomm Bluetooth 5 receiver, the latest Bluetooth version. Bluetooth 5 runs at 2 Mbps as opposed to 1 Mbps for the 4.2 version and is supposed to be good for 800 ft. It is also compatible with the aptX audio codec which promises CD quality audio as well as the aptX HD version which is capable of 24 bit/48 kHz. Now all of this is only useful if your source is sending via Bluetooth 5 /aptX. It is, of course, backwards compatible so you can use all your BT devices to send music.
It is interesting to note that there is a microphone input on the front of the unit. It is indicated on a picture in the manual but there is no mention at all in the specs or the operating instructions. A quick email to Burson revealed that this 3.5 mm input is present for gamers. Round about 1979 I did play a bit of Pong on my TRS-80 so I consider myself unqualified to evaluate the utility of this feature. I do wonder, however, about the concept of purchasing such an expensive component for gaming! This input was not tested during this review.
The C3R does a lot of things in a very small box. The case is less than 1/3 the size of a standard audio component case. The small size is made possible by two major design features; the power supply design has no transformers and the case also serves as a heat sink. The case is ribbed aluminum and after many hours of operation the case was barely warm. Certainly, this combination of high-quality audio, multiple I/O types and formats and a very small case will appeal to a lot of desktop audio lovers. For those interested in a more technical discussion of these two design features there is a specific page assigned to each one on the Burson web site.
![[Burson C3R Inside view]](../jpg/burson_conductor_inside_view.jpg)
The manual says that the sound improves within minutes of power-up and may continue to improve over several weeks. The test unit ran for a day before the review activities commenced. The first step was to test the unit in as many different modes as possible just to get a general picture of what it can do. I started by connecting my Arcam CD72 transport/player via the analog out and the 2 transport outputs (Toslink and coax). One of my turntables was connected to the other analog input and my PC was connected via USB. I used the supplied, but very short, cable and was obliged to use a 1 meter long, good quality, USB extender cable to reach my PC. Some devices will recommend that the USB cable be as short as possible, in my case the total length ended up at nearly 2 meters with no perceived ill effects. The headphone outputs were tested with my Grado SR125 headphones. Fortunately, my Samsung A50 smart phone is equipped with Bluetooth 5 and is able of running aptX (not aptX HD though). I had to go into Developer Mode in my phone to change the setting to aptX! My test was limited to about 30 ft. And I did discover that changing rooms caused to signal to cut out. It appears that Bluetooth 5 doesn't like walls! On the positive side, pairing devices running Bluetooth 5 is a snap, I never had the slightest problem.
Not at all surprisingly, every tested inputs and outputs worked fine. All that was required to get the C3R to talk to JRiver on my PC was to unplug the USB cable and then plug it back in. Note that the Burson driver had already been installed at this point. It took a while to get the correct settings setup on JPLAY FEMTO and I found it necessary to download and install the latest version of the Burson USB-Audio driver for the PC to talk to the DAC. Nothing unexpected there. The OLED screen is white writing on a black background and the input/output selector and volume level are easy to see from my normal listening distance however the Settings display was too small to read from that distance. In order to to read which input or output was active for example I had to get up and move closer to the display. The display can be set to read horizontally or vertically which is a nice touch. I should mention that there is a stand available (the Cool Stand) to safely set the unit vertically, this is a separate purchase at $125. The small metal remote looks modern and elegant and works fine with 4 buttons: 2 for volume up/down, input selection and muting. All you need really. The symbols used on the front and back of the unit, the remote and on the OLED display are efficient and easy to understand. A nice touch.Operating the unit was a learning experience. There are a few things that the manual does not explain, more on the manual later! The first thing that I learned was that the High/Low Gain setting affect both the headphone output and the Pre-Out. For some reason, in the Settings display, the gain setting is listed as HEA Level. HUH! Why not just say GAIN? Depending on the record, the high gain setting was sometimes necessary to get sufficient sound levels from my turntable input and I was able to use this same setting for other inputs such as the CD player but with a much lower volume setting. Conversely, the high gain setting was way too powerful for my Grado SR125 headphones (32 ohms). This lesson was learned the hard way as I nearly destroyed my headphones and my eardrums! There really should be a warning in the manual. Happily, I was able to run almost all the time in low gain mode and avoid the switching hassle. I understand that the high gain setting would be appropriate for some of the more difficult to drive headphones on the market. I seldom use my headphones, so I really am out of my depth on this subject. I also discovered that the headphone outputs functions in DAC mode however there is no volume control. It all boils down to this; the High/Low gain feature is necessary for the headphone amp to be compatible with the various headphones on the market but linking it in the same box with a preamp means that there are some precautions that the user must understand and live with. I suspect that isolating the gain switching exclusively to the headphone amp is not feasible due to the architecture of the analog section or they would have already done it.
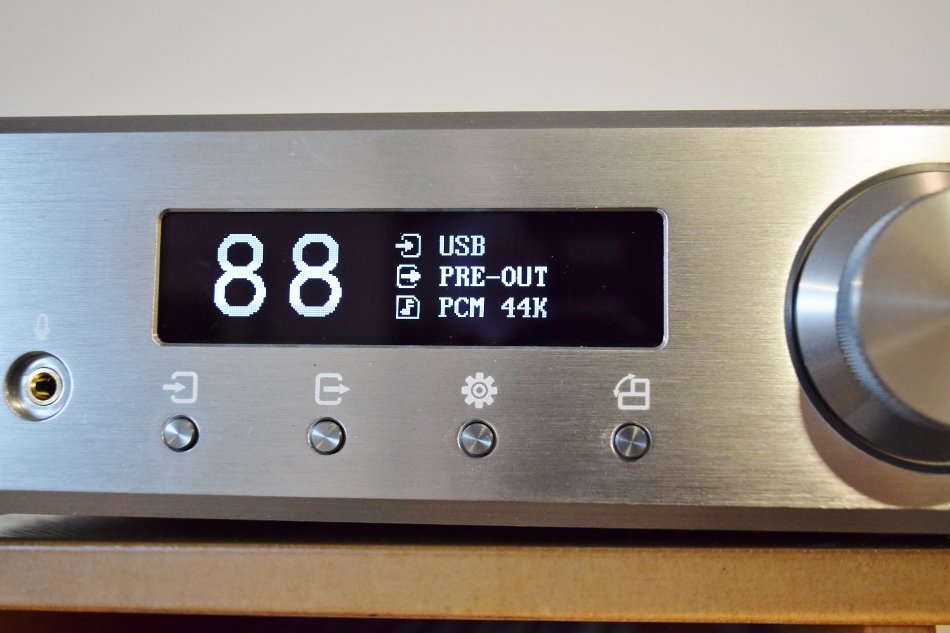
![[Burson C3r Display2]](../jpg/burson_conductor_display2.jpg)
In keeping with the very disappointing industry trend, the manual has a few problems. I found a bit strange that there was no manual included in the box that I received, and I therefore downloaded it from the Burson website. I discovered on page 3 of this downloaded manual, a QR code with a note explaining that this code will bring you to a website where you can download the manual. HUH! Well, it turns out that the download version of the manual contains links to web pages where the necessary USB interface setup guides and Windows Drivers can be found. There is also a link to the Warranty data as well as to the pages mentioned above where additional technical information is provided. (however, many people will find this additional information way to technical)
The manual does cover the basics, but sometimes just barely so. For example, listing the filters in the specifications with no information about what they do or how to use them. Not even a listing of the default settings! There is no quantitative information on the Pre-Amp out level. There are no input or output impedance values given for the analog stage. (Note: I did find this information on the Specification page on the Burson web site!) There is no explanation of how the HEA Level (Gain) setting works. The manual could certainly benefit from adding a simple block diagram showing how the various inputs and outputs are switched and processed as well as some sort of chart to explain all of the filters. My late 1990's B&K preamp has such a block diagram in the manual and I have referred to it many times over the years.
There is no warning in the manual to explain that running some headphones on the high gain setting may be harmful to the health of your headphones, not to mention your eardrums. There is, however, a line in the manual, on page 5, explaining that one must never connect or disconnect the headphones while music is playing as this may damage the unit. I wonder how many people read this line only after having done this?
The owner's manual is part of the experience of owning a stereo component. If the manual has a high-quality look and feel, this impression rubs off on the equipment, but the contrary is also true. Burson, and many others for that matter, should invest some effort into making their manual up to the standards of their product.
[Fast forward to Part 2 (sound, settings and conclusions)]
![]()
DISCLAIMER. TNT-Audio is a 100% independent magazine that neither accepts advertising from companies nor requires readers to register or pay for subscriptions. After publication of reviews, the authors do not retain samples other than on long-term loan for further evaluation or comparison with later-received gear. Hence, all contents are written free of any “editorial” or “advertising” influence, and all reviews in this publication, positive or negative, reflect the independent opinions of their respective authors. TNT-Audio will publish all manufacturer responses, subject to the reviewer's right to reply in turn.
© Copyright 2021 Roger McCuaig - roger@tnt-audio.com - www.tnt-audio.com
[ Home | Staff & Contacts | HiFi Playground | Listening tests | DIY & Tweakings | Music & Books ]